
It was love at first sight (yes, I am into romance and fabric). I am a hopeless romantic when it comes to Christmas fabric. Who can resist the reindeer, trees, and snowflakes? I for one, can not. I love Christmas fabric more than all (well Christmas and Halloween, and all cute fabrics!). When I found this moda 25th & pine, I knew I had found the love of my fabric life!!! Now I just had to come up with the perfect pattern for my new loves!
**If you do want to make the quilt block tutorial, please read through ALL instructions. This tutorial is ONLY for a quilt block, the pattern for this quilt is for sale via paypal payment if you email me.


Oh hello beautiful fabrics!! I loves you!!

OK I also HAD to throw this in the mix because... Well look at it!

And I added pink, because pink is part of my Christmas. If you're not into pink for Christmas hurry and scroll past this picture!

I used two different whites. One was my snowflakes, which I used for all my stars

I also used a plain white as a border. Only because I thought I wouldn't have enough of my snowflakes. It ended up adding more texture to the quilt.
Onto the pattern
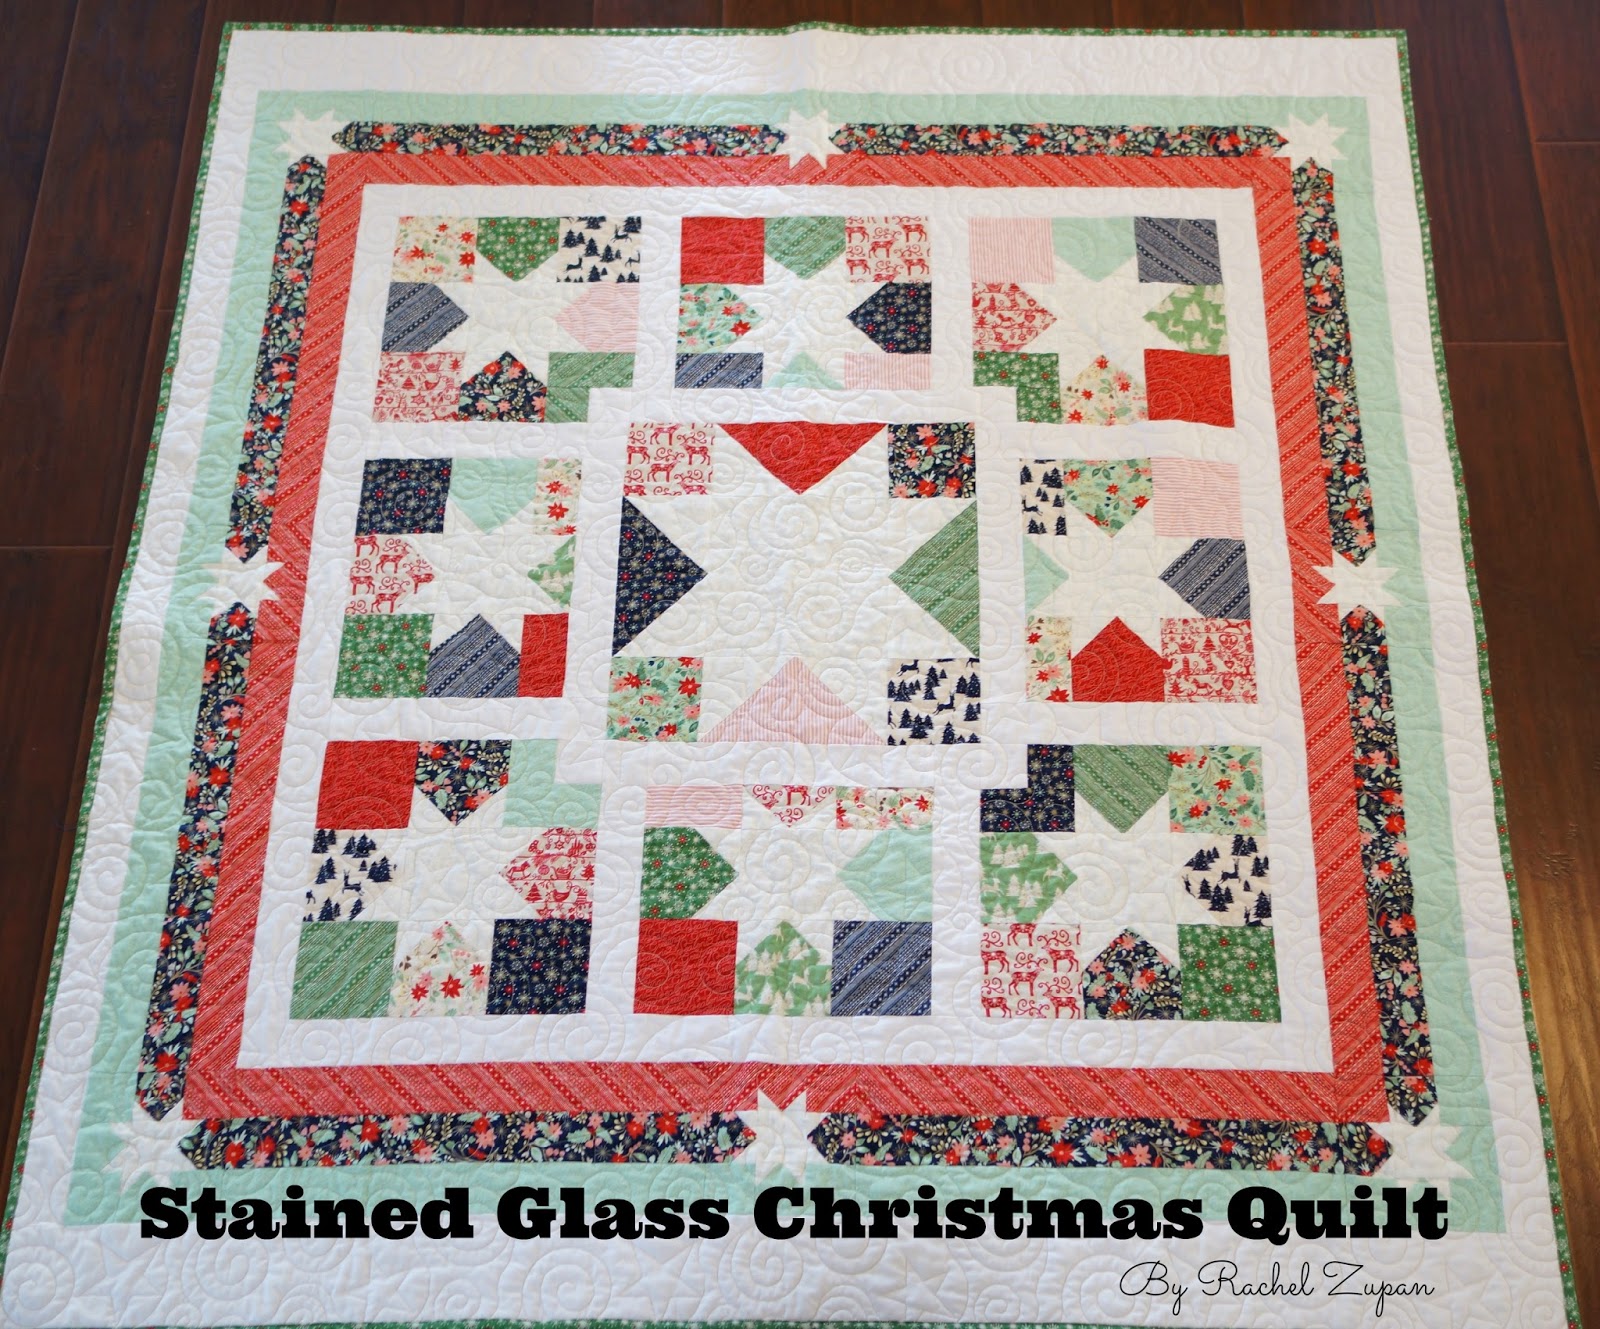
I was doodling star quilts, and I thought stars for Christmas would be so much fun! I drew this pattern and it reminded me of a stained glass window. I knew it would be perfect for my new fabric loves.

The only problem was, I didn't know how to make stars, or how to paper piece (which I think you should always do when making stars, they just look cleaner and nicer).
I had to teach myself paper piecing, and I had to figure out the measurements to make all my star points. That was FUN (not!) I just used scrap fabric and after about 20 attempts (OK maybe four) I had it down.
If you have never paper pieced, you should!! Not only is it super fun to rip the paper off your fabric (I LOVE IT) it's super satisfying to hear your needle dulling as you sew through paper (ok that's not true, but I love the crispy sound of paper being sewn! So try it, seriously try it!)
And just because I love paper piecing so much, I will show you how to make a star block! YEAH!!! Star block and paper piecing! It's like Christmas in May!
You're going to need ONE 4 1/2 x 4 1/2 inch white square
EIGHT 2 1/2 x 2 1/2 inch white squares

EIGHT 2 1/2 x 2 1/2 inch white pieces of paper with a line drawn down the middle

EIGHT 4 1/2 by 4 1/2 inch patterned fabric squares
Oh my heck look at that fabric!! It makes me SO happy!!!! I'm dying of Christmas cuteness!

OK now choose your layout
*See that square in the top right corner, it has a little white taken out of it, that is for the quilt that I made (which YOU can make too, but this tutorial is JUST for a quilt BLOCK, not the whole quilt, so ignore that little square, pretend it's not there!)

Lay a 2 1/2 x 2 1/2 inch white square right side down on top of your fabric. This will be your first star point so make sure you have it where you want the star point to be. Make sense? Scroll ahead and look at the finished picture if you don't understand. Since my fabric is directional, and I wanted to keep it all the same direction, I had to be careful about where my star points were. If you want to make your life easier, then just make your stars and don't worry about the direction of your fabric.

Lay a paper on top, making sure you lay it so that when it is sewn and cut, you will have a star point. Notice in the below picture that my fabric is laid out WRONG I totally did that on purpose (not really) to show you that you need to be careful and not careless (like me) otherwise you're going to sew it on wrong and then you're going to get mad and have to unpick (like me)

Sew right down the middle, on that nice line your drew on-
Oh good I turned it the right way before I sewed it on!!

Press the seam, open, and press again (do this with the paper still attached)

See I've still got my paper on!

And now for my favorite part!!!
Fold the fabric down and outta the way, it's paper tearing time!

Grab that paper and rip it off


Yes I love doing it so much that I just gave you four pictures of me tearing paper. It really is that satisfying!!
Now cut off the EXTRA fabric, not your star point!! Don't cut off your star point! Don't do it! I have totally done it! It's not fun! So be careful

Cutting is not fun so it only gets one picture (yes I am aware that my fabric changed, I was too distracted by paper piecing to remember to take pictures of my first block, the steps are still the same, so hopefully I didn't confuse you too badly)
Moving on to the next star point we repeat what we just did! Except this time your white 2 1/2 x 2 1/2 inch square will overlap the star point you just made. Which it FINE! In fact it is necessary!


Sew it and tear it. I won't post a million pictures of that again....
You have your first star point square!

Repeat with your next square

More tearing.. I couldn't help it..

It helps to keep everything laid out nicely so you know which fabric will be star points and where everything is going
*Remember we are ignoring the little white square in the top right, it's not there!!

We have all our stars points sewn on, so now we sew our block together. This will be a 12 1/2 x 12 1/2 inch quilt block.
You can make as many blocks as you want and have an adorable Christmas quilt. Or make one block and have a wall hanging!
Or if you want to get really crazy, make a huge stained glass Christmas quilt!!

And be sure to add a complicated border just for the heck of it! Why not, right?

I LOVE creating free patterns and posting them. This quilt is my first exception. When I made this quilt it seemed easy and fun (maybe because I'm crazy) but when I went to make the instructions I realized that this was pretty complicated. So complicated that it took hours of work and 13 pages to make a pattern. A pattern that I drew and wrote on graph paper (can you tell I'm new to this)! This is my first attempt at selling a pattern, so if you do buy it and you have questions PLEASE PLEASE email me and I will help you in every way I can. I am still learning how to create patterns, so I LOVE feedback.

If you are interested in purchasing this quilt, please email me
It is $7 for an emailed PDF or $10 if you would like a mailed copy
Cheers to quilting!
No comments:
Post a Comment